27 December 2006

Easy-peasy Pesto and Penne


This is one of our all-time favorite dishes, and it is so simple which makes it even better. Anytime you are looking for a great pasta recipe that you can whip up in a flash and impress anyone - this is your dish. Just follow these few key rules and you can't go wrong:

1. You need a food processor - the small one seems to work best for this, but only because I think the large one is too big so I haven't used it for this.
2. You must use fresh basil (or the fresh in a tube basil) - dried will NOT work.
3. You must use fresh parmesan, the canned spaghetti cheese is not a good substitute.

INGREDIENTS

12 ounces penne pasta
1 (8.5-ounce) jar sun-dried tomatoes packed in olive oil
2 garlic cloves
Salt and freshly ground black pepper
1 cup (packed) fresh basil leaves
1/2 cup freshly grated Parmesan

DIRECTIONS

Cook the pasta in a large pot of boiling salted water until tender but still firm to the bite, stirring occasionally, about 8 minutes. Drain, reserving 1 cup of the cooking liquid. Meanwhile, blend the sun-dried tomatoes and their oil, garlic, salt and pepper, to taste, and basil in a food processor and blend until the tomatoes are finely chopped. Transfer the tomato mixture to a large bowl. Stir in the Parmesan.

Add the pasta to the pesto and toss to coat, adding enough reserved cooking liquid to moisten. Season the pasta, to taste, with salt and pepper and serve. (I never add the extra liquid)

09 December 2006

Not-So-Ordinary Meat Loaf

As a kid, I remember meat loaf night in a rather unpleasant sense - well basically, I hated it. That dry, cake-like meat with the ketchup top in almost a gel form - ick. It was definitely one of those meals which I swore I'd NEVER make when I grew up and cooked for myself, NEVER. The years continued to pass and while my mother quit making it, I still never forgot my feeling of disgust when the term "meat loaf" was brought up. Oddly enough, one of my Cooking Light magazines arrived one month and there on the cover was the dreaded meat loaf. It was a rather disappointing day in my home, since I have come to treasure the day each month when my Cooking Light arrives and to see that awful item some people call FOOD on the cover, well, it really ruined the moment. However, as a faithful reader, I scanned through the issue and quickly arrived at the page with the meat loaf recipes - yes, plural. Hmmmm. Several recipes for that blasted concoction called dinner? Now I was intrigued, so I continued, reading through list of ingredients after list and it hit me - with this many different options, I'm sure I could find ONE which might actually be good. As soon as the thought entered my mind I saw it, no pictures, just the title - Italian-Style Meat Loaf. I love Italian food, and this looks easy enough, so why not? Cooking Light hadn't let me down yet, so I'd keep trying! I prepared this along with some mashed potatoes and was totally shocked with the first bite - I actually liked it. Me, the one who avoided meat loaf like the plague, the one who couldn't say the term Meat Loaf without making a face, the one who swore she'd never make it, I actually took the challenge and won. Amazing. Not only was this dinner a huge success, but this menu has made it into our normal rotation and fills our bellies twice a month. Any skeptics, please, give this a try - I promise you will NOT be sorry!

INGREDIENTS

3/4 pounds 92% lean ground beef
3/4 pounds lean ground turkey
1 cup fat-free tomato-basil pasta sauce, divided
1/2 cup Italian-seasoned breadcrumbs
1/2 cup (2 ounces) preshredded fresh Parmesan cheese
1/2 cup finely chopped onion
2 tablespoon dried parsley
1 teaspoon garlic powder
1/2 teaspoon dried basil
1/2 teaspoon dried oregano
1/2 teaspoon salt
1/4 teaspoon black pepper
2 large egg whites
Cooking spray

DIRECTIONS

Preheat oven to 350°.

Combine beef, 1/2 cup pasta sauce, and remaining ingredients except cooking spray in a large bowl. Shape beef mixture into an 8 x 4-inch loaf on a broiler pan coated with cooking spray. Brush remaining 1/2 cup pasta sauce over top of meat loaf.

Bake at 350° for 1 hour and 10 minutes or until a thermometer registers 160°. Let stand 10 minutes. Cut loaf into 12 slices.

15 November 2006

Preparing for the holidays...


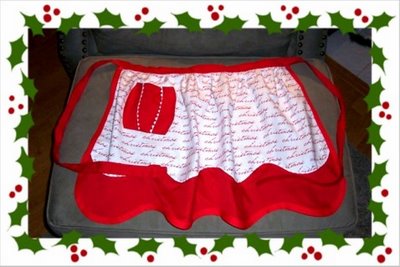
As we get closer and closer to the holidays, my creative juices tend to flow more freely. I begin pondering what delish foods I want to test in order to create a meal for Christmas - since once again my husband and I will be hosting it at our place (with a little help of course!). This year, I know I'll be adding a bread pudding recipe I discovered - but still need to tweak - and will most likely have a variety of cookies as well. As I was sitting, debating between various potato options, I had a non-edible idea emerge: "I want a Christmas Apron and I want to make it myself"! So ... after viewing the Jessie Steele options online, I headed up to the local craft store and perused the selection of patterns until I found one I liked. I then wandered over to the material to pick out the rest of the pieces for my artwork. After several hours of cutting and pinning and sewing and pinning and ironing and sewing, it was complete, and it was ... CUTE!!! Who knew how simple it would be to create such a fabulous entertaining apron? After admiring my work for a short time, I quickly realized I wanted more of these, but in different colors and themes and designs, oh my! I also realized how much I enjoy sewing, especially when the work is simple and the outcome is perfect. I'm sure a few of these will even make it onto my Christmas list for some friends and family and I really hope they enjoy them as much as I do!

With that said, it appears this wonderful list of recipes and wine comments will begin to include my latest and greatest sewing projects as well. If along the process you see something you would be interested in, please let me know as for a small fee, I'm sure I could create you something just as adorable! And if we don't visit with one another in the next week, I wish you a Happy Thanksgiving and hope your weekend is filled with family, friends, and ... FOOD!

14 November 2006

Juvenile?


Wow.

That's really all I can say about this amazing bottle of wine. Wow. My husband and I have recently become huge fans of red zinfandel (which is NOTHING like the white zin that is strangly popular, but never makes it into our household!). A friend of mine and I were out at a wine bar a while back and the bartender we be-friended poured us both a small glass of this to try. At that moment I knew I was hooked. The wonderful fruit aroma, the smooth, bold flavor - this was heaven in a glass!

Slowly my husband andI began trying various red zinfandels from different vineyards and nothing was nearly as fabulous. We started searching for a bottle of Turley, asking at numerous wine shops - all with the same answer: No, we don't have any Turley. It tends to be reserved for restaraunts and is really hard to get. *sigh* This was extremely sad news since the places that we knew who carried Turley where of course more of the high end steak restaraunts and the cost for a glass or bottle was similar to the cost of dinner - we decided against it most of the time since we are not yet wine connesuers so its hard to spend THAT much. We settled for constantly asking the wine shops, but expecting a no.

Then, this past August we were in New Orleans for my birthday and passed a wine shop several times. Finally, we decided to stop in and paruse their selection. We walked in the door, looked at the racks in front of us and there, at the bottom, was the bottled heaven - in fact there were 6 bottles - two Juvenile and 4 others. Quickly, I snatched them up in my arms smiling. This was afterall my birthday trip so the wine would be my birthday present! What makes it even better is the owner saw us and commented about those 6 bottles being his YEARLY allottment. I wish now I would have bought all six. Maybe next time.

We enjoyed one bottle a few weeks ago and it was simply delish. The other bottle is still in our wine cooler ... waiting for that next raining day that only this simple piece of perfection can clear up.

Homemade Oatmeal Cream Pies

My husband LOVES oatmeal cream pies, these are as much a staple in our home as bread, milk, and eggs are - maybe even more so! After watching him eat his THIRD cookie and calling it breakfast one day I decided I need to see if I can make these at home. I found a recipe way back in the summer and bought the ingredients, thinking to myself "I'll make them this weekend." Well needless to say, the past few months were so packed with wedding planning and finalizing everything that I was never able to get around to making them. So this past weekend, I got the baking itch (and wanted a reason to use my new Kitchen Aid Mixer) so I pulled out the recipe, gathered all the ingredients, and got to work. While I don't have a picture at this time since my camera is filled with honeymoon shots, I am hoping to add one in the near future!

A few notes:
  • I don't know how I ever made cookies without a mixer, everything is so much simpler and quicker now! Highly worth the investment!
  • My husband has determined that these are SO MUCH better than the store bought ones. I haven't decided if this is a good thing or not ... We'll see how often I have to bake!
  • Molasses is messy. The cream filling in these ... Even worse!
  • Finally - I accidentally forgot the salt in the filling, but they still came out great!

On to the recipe.

INGREDIENTS:

Cookies
1 cup margarine
3/4 cup dark brown sugar
1/2 cup sugar
1 tablespoon molasses
1 teaspoon vanilla
2 eggs
1 1/2 cups flour
1/2 teaspoon salt
1 teaspoon baking soda
1/8 teaspoon cinnamon
1 1/2 cups quick oats
Cream Filling
2 teaspoons very hot water
1/4 teaspoon salt
1 (7 ounce) jar marshmallow cream
1/2 cup shortening
1/3 cup powdered sugar
1/2 teaspoon vanilla

DIRECTIONS:

1) Preheat over to 350 degrees F.
2) In large bowl, cream margarine, sugars, molasses, vanilla, and eggs.
3) Combine flour, salt, baking soda, and cinnamon.
4) Add to the creamed mixture; mix in the oats.
5) Drop dough by TBS on ungreased sheets.
6) Bake for 10-12 minutes,or until just starting to brown around the edges. They will look moist; don't overcook.
7) While the cookies bake prepare the filling. In small bowl, disolve the salt in the hot water. Allow this to cool.
8) Combine marshmallow cream, shortning, powdered sugar, and vanilla in med bowl; mix on hi until fluffy.
9) Add the cooled salt water and mix well.
10) Spread filling on flat side of one cooled cookie, press 2nd cookie on top.

11 September 2006

Strawberry Spinach Salad


I tried this for the first time at a friends wedding. I was slightly nervous mixing fresh, sweet strawberries with spinach and dressing, but I was pleasantly surprised by how well it worked together. What is even better is when I made this for the first time at home - my once McDonald's and Whataburger fiance, who was skeptical as well, tried it and enjoyed it as well. I kept finding him sneaking pieces of strawberries and spinach out of the bowl! I've learned that as my cooking skills increase and I try a larger variety of dishes, my fiance is also getting a better variety of food and is learning to appreciate a healthier and more flavorful menu. As we prepare for the wedding and beginning of our life together, there is a quiet understanding between us that before we even think about little ones, we need to clean up our eating habits - at it seems we are well on our way! So, without further hesitation, here's the breakdown.

DRESSING

2 T Sesame Seeds
1 T Poppy Seeds
2 T Sugar
1/2 C Olive Oil
1/4 C Balsamic Vinegar
1/4 tsp Paprika
1/4 tsp Worcestershire Sauce
1 T Minced Red Onion

Combine all ingredients in a dressing cruet and shake vigorously. Chill dressing for at least 30 minutes.

SALAD

10 oz Fresh Spinach
1 qt Fresh Strawberries, sliced (an egg slicer works wonders!)
1/4 C Sliced Almonds (I use the toffee ones, other nuts will also work)
1/4 C Feta (or goat cheese)

Combine salad ingredients in a large bowl, top with dressing and coat evenly.

**Note: This recipe produces EXTRA dressing, you can easily double to spinach salad and still have enough.

21 August 2006

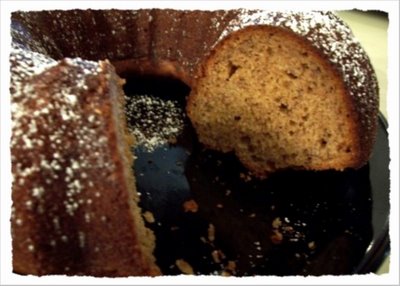
Becky's Banana Bread


Anyone who knows me understands I have a fascination with banana's and anything banana related, so I continue to search for the tasty banana bread recipe that won't cause me to go up a pant size everytime I make it. While I continue to make slight changes to my recipe, I still think this one is worthy of a post, so here we are. Some of the measurements are assumed since I add a dash of this, a little more than, and so on - but this should get you started none the less.

INGREDIENTS:

3/4 C sugar
1/4 C butter, softened
2 1/4 C ripe banana (or about 4 banana's)
1/4 C skim milk
1/4 C reduced fat cour cream
2 eggs whites
1 tsp vanilla
2 C flour
1/4 tsp cinnamon
1/4 tsp nutmeg
1 tsp baking soda
1/2 tsp salt
Cooking spray

DIRECTIONS:

Preheat oven to 350.

Mix sugar and butter on medium until fully blended. Add banana, milk, sour cream, egg whites and vanilla. Set aside.

Combine flour, cinnamon, nutmeg, baking soda, and salt. Add to banana mixture and beat until well blended.

Spray pan with cooking spray and coat with a layer of cinnamon and sugar (similar to flouring a pan). Add batter and bake for 60 minutes, or until toothpick comes out clean. Let cool and top with powdered sugar.

Enjoy!

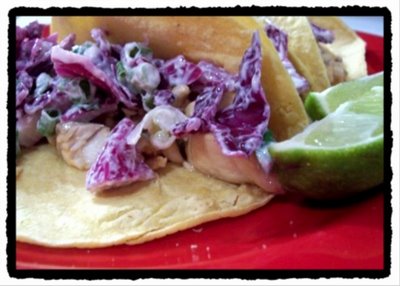
Simple Fish Tacos


After spending my graduate school time in San Diego, where the seafood was considerably fresh and tasty, I was able to improve my taste from fish sticks and shrimp cocktail to actual seafood an adult would eat. One of the dishes I feel in love with was fish taco's, although my recipe differs from the one's I enjoyed in Southern California since I do not batter and fry them. Sure the crunch can be nice, but when you work sitting at a computer and don't spend nearly as much time being active as you did in college, your hips appreciate the lack of fried food calories.

INGREDIENTS:

3 Tbl taco seasoning
Juice from 1 lime and 1 orange
1 pound of white fish (mahimahi, tilapia, etc)
2 Tbl vegetable oil
1/2 head of red cabbage, chopped
1/2 C green onions, chopped
3/4 C low fat sour cream
2 Tbl fresh cilantro, chopped
1/2 tsp Hot sauce (Sriachi, etc)
8 corn tortillas
1 lime, cut into wedges

DIRECTIONS:

Combine taco seasoning, lime, and orange juice. Cut fish into bite size pieces, add to juice mixture, and toss to coat. Marinate for 30 minutes.

Heat oil in large skillet over medium high heat. Add fish and saute until fish is done, usually abut 5-10 minutes.

Mix cabbage, green onions, and cilantro. Combine sour cream and hot sauce, then coat cabbage mixture.

Warm tortilla's according to package. Fill with fish and cabbage mixture and garnish with lime wedge. (Squeeze juice onto taco before eating - delish!)

Serving size is 2 tacos and they have about 175 calories for each taco.

08 July 2006

A Wine Tale

Penfolds Koonunga Hill Shiraz Cabernet has turned into one of our absolute favorite anyday wines. It is an Australian wine, which is wonderful since most of our favorites are also Australian, so that alone would be a reason for us to at least try it. To make it even better, you should be able to find this at just about any store that has a decent selection, basically meaning the corner gas station won't carry it, but any place that carries Shiraz has a good chance. Oh - and to add to the greatness, it runs around $10 or so a bottle, give or a take.

In my mind, this has a great flavor which I'm not used to getting from a less expensive bottle of wine and win's my taste test over the ever-popular Rosemount Shiraz (another of which is in the same price range and makes it to our dinner table quite often!). I make no claim to be a wine taster of any education, but I know what I like and thus far, anyone I've had try this has enjoyed it. One warning: just because it's Penfolds doesn't mean it'll be the same. I am not nearly as much of a fan of the Thomas Hyland and Rawson's Retreat varieties, make sure if you are looking for this that you do indeed get the "Koonunga Hill" bottle. If history proves itself, you won't be disappointed!

03 July 2006

Chicken Enchiladas with Salsa Verde

This is inspired be a similar recipe I found in a magazine. One thing which irritates me to no end is when a recipe calls for some sort of cooked item with no instructions on how to cook it. The original recipe does this with the chicken, so I have included my suggested cooking method rather than write "cup of cooked chicken".

When I first read this recipe, I was hesitant to attempt it since I am not a big enchilada fan, due to the soft corn tortillas used. Luckily, I was feeling daring one night and with my recent attempt to eat healthier, figure why not give it a shot - I mean the worst that could happen is it gets tossed in the trash and we end up with Chinese Take Out. Surprisingly, with one bite, I knew this was a keeper!

INGREDIENTS

1 C chopped onion
1/4 C fresh cilantro
2 Garlic cloves
8 oz salsa Verde (can be store bought)
3 skinless, boneless chicken breasts
1/3 C reduced fat cream cheese
Fat-free, low sodium Chicken broth
12 White Corn Tortilla's
Cooking spray
1/4 C crumbled Queso Fresco
Chili Powder

DIRECTIONS

Pre-heat oven to 350. Place chicken breasts in oven dish and add some chicken broth (I usually add enough to halfway submerge the chicken, probably about 1 C or so), this helps keep the chicken moist. I also like to season the chicken with any variety of black pepper, white pepper, red pepper, cumin, garlic powder, paprika, chili powder, and / or onion powder. These you can switch out to your own taste. Cover the dish with aluminum foil and bake 30 minutes. Flip the chicken and bake another 20 minutes or until chicken is done. This will obviously differ depending on the size of your chicken breasts. One completely cooked, remove chicken to a bowl and use a fork to shred. Discard remaining chicken broth. Set oven to 425.

Combine onion, cilantro, garlic, and salsa in blender and blend until smooth. In another bowl, combine chicken, cream cheese, and half of salsa mixture. Reserve remaining salsa.


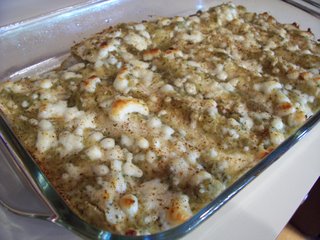
Spoon chicken mixture into corn tortilla, using a small enough amount to allow the tortilla to be rolled into a traditional enchilada. Place rolled enchilada seem-side down in a greased baking dish (I use Pam). Continue this process until all the chicken mixture has been used.

Top enchiladas with remaining salsa (I use a spatula to cover the tortilla's completely to prevent any crispy spots). Sprinkle with crumbles queso and top with chili powder.

Bake for about 18 minutes or until thoroughly heated (chicken has already been cooked, so no worries here!). The cheese should be melted and some areas browned.


Serve these enchilada's with refried beans, black beans, spanish rice, chips and salsa or guacamole, or any other wonderful side dish you desire - or even alone. For those who prefer, a Corona with a lime would be perfect!

NUTRITIONAL INFO:

Serving size: 2 enchiladas


Calories: 327
Fat: 9.5g
Protein: 28.5g
Carb: 31g
Fiber: 3.3g
Chol: 78mg
Iron: 1.8mg
Sodium: 493mg
Calc: 149mg

Welcome


First and foremost I want to say thank you for a taking a moment to see what this is all about. I hope to slowly compile a list of wonderful recipes as well as any other tidbits which may be useful. I have to take a moment to thank a great friend of mine who has inspired me not only to post this, but to be brave and take a stab at things I would otherwise turn my nose up at. She has earned the nickname "Betty Crocker" among our group of friends and we continue to wait patiently (or rather impatiently) for her to list new recipes in her own blog. So take some time and browse, this will continue to grow and hopefully you will walk away with at least a new idea of what to make for company. Let's eat!